Papercraft Manual
User-facing documentation for Papercraft XML templates and the X39.Solutions.PdfTemplate compatibility bridge.
First Document
| Previous: Introduction | Manual home | Next: Areas |
What Is This?
A template is an XML document that describes the generated PDF.
The root element name is flexible; this manual uses template.
Inside the root, the usual document sections are body, header, footer,
background, foreground and areas.
The body is the main page flow.
The other sections are optional layers, fixed regions or repeated page sections that you add only when the document
needs them.
The examples in this manual omit xmlns because the XML reader assigns the built-in control namespace
to elements that do not already have an XML namespace.
That lets template authors write <text> instead of a longer namespaced element name.
Only add XML namespaces when an application deliberately uses custom control namespaces.
When Should I Use This?
Use this chapter when you create a new template or need to understand where content belongs in an existing one.
Start with body.
Add a header, footer, background, foreground or fixed area only when the document has that specific layout need.
How Do I Start?
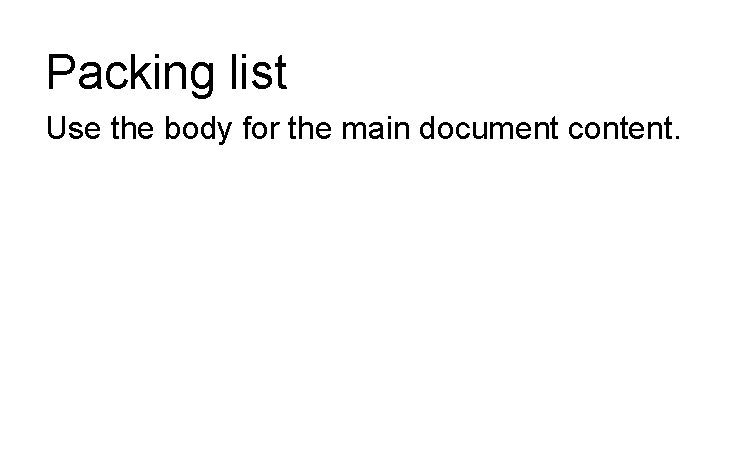
Start with a complete XML file containing one body section and one visible control.
<?xml version="1.0" encoding="utf-8"?>
<template>
    <body>
        <text fontsize="18">Packing list</text>
        <text>Use the body for the main document content.</text>
    </body>
</template>

Choose A Section
| Section | Use it for | Notes |
|---|---|---|
body |
Main document content. | Content flows through the available page space and can continue on later pages. |
header |
Repeated content at the top of each page. | Keep it short; it is measured inside the top page band. |
footer |
Repeated content at the bottom of each page. | Use it for repeated notes, separators or page-number controls. |
background |
Page-wide content behind the document. | It is rendered on every page and ignores the normal page margin. |
foreground |
Page-wide content above the document. | Use it sparingly for overlays such as draft marks. |
areas |
Fixed-position boxes in the document. | Area content is positioned by absolute coordinates and does not follow the body flow. |
Understand The Default Namespace
Most templates should not set a default XML namespace.
When an element has no namespace, the reader assigns the built-in control namespace configured by the runtime.
Existing compatibility templates may still refer to the legacy XML namespace
X39.Solutions.PdfTemplate.Controls; keep that namespace unchanged when maintaining those templates.
For normal template-author work, prefer the unprefixed examples used throughout this manual.
If a template sets a different default namespace, the reader keeps that namespace for the unprefixed elements:
<template xmlns="MyApp.PdfControls">
    <body>
        <text>This text is no longer in the built-in control namespace.</text>
    </body>
</template>
In that example, text is read as MyApp.PdfControls:text, so the built-in text control is not found.
Do not use prefixed element names such as default:text to work around this in current templates;
the reader validates the XML element name itself and rejects prefixed control names.
Prefer no default namespace, or have the application team register the controls that should be available
in the namespace the template uses.
If your application adds custom controls, ask the application team which unprefixed element names are available. Developer-facing control registration guidance lives in the developer integration appendix.
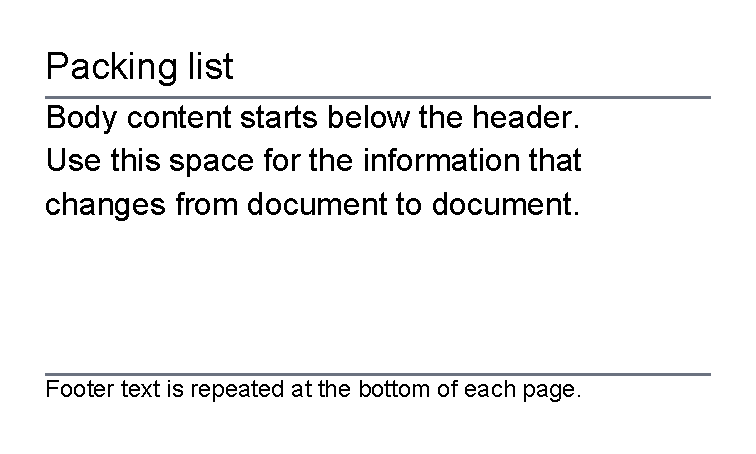
Add A Header And Footer
Use header and footer for content that should appear around the body on each page.
<?xml version="1.0" encoding="utf-8"?>
<template>
    <header>
        <text fontsize="14">Packing list</text>
        <line thickness="1pt" length="100%" color="#6b7280"/>
    </header>
    <body>
        <text>Body content starts below the header.</text>
        <text>Use this space for the information that changes from document to document.</text>
    </body>
    <footer>
        <line thickness="1pt" length="100%" color="#6b7280"/>
        <text fontsize="9">Footer text is repeated at the bottom of each page.</text>
    </footer>
</template>

Understand Page Margins
Page margin is document setup, not a body control.
The preview below is generated with a wider page margin in the documentation sample options.
The XML places a border in the body; the margin leaves space around the body area.
<?xml version="1.0" encoding="utf-8"?>
<template>
    <body>
        <border thickness="1pt" color="#2563eb" background="#eff6ff" padding="3mm">
            <text>The page margin leaves space around this content area.</text>
        </border>
    </body>
</template>


If your document needs different page margins, use the page setup exposed by your application. Developer-facing setup details belong in the developer integration appendix.
Use Background And Foreground Layers
Use background for content behind the body and foreground for content over the body.
Both layers are repeated on every page.
They are useful for watermarks, draft marks and page-wide marks that should not affect body layout.
<?xml version="1.0" encoding="utf-8"?>
<template>
    <background>
        <border background="#f3f4f6"/>
    </background>
    <body>
        <text fontsize="16">Draft invoice</text>
        <text>The body is rendered between the background and foreground layers.</text>
    </body>
    <foreground>
        <text
            fontsize="24"
            foreground="#b91c1c66"
            horizontalAlignment="center"
            verticalAlignment="center">DRAFT</text>
    </foreground>
</template>


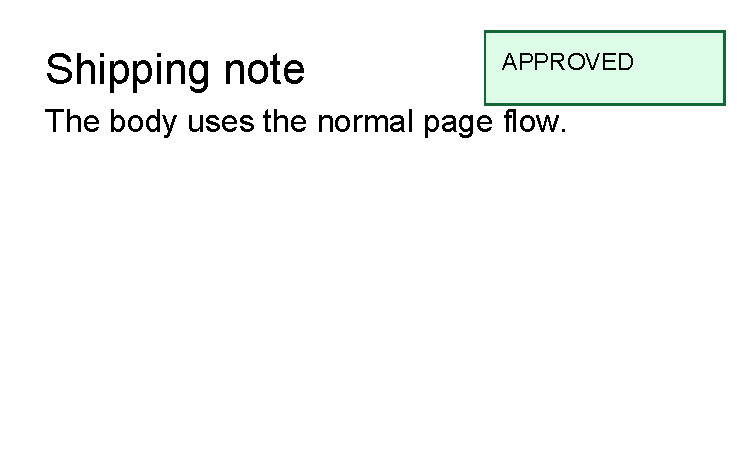
Use Fixed Areas
Use areas when content must sit at a specific page position instead of flowing with the body.
Common examples are approval stamps, fold marks or fixed labels.
Each area renders once, on the generated page that contains its absolute document position.
Do not use areas for normal paragraphs or tables; keep those in the body so they can flow naturally.
To make an area visible, give the area a size such as width and height,
plus a page position such as top, left, right or bottom.
<?xml version="1.0" encoding="utf-8"?>
<template>
    <body>
        <text fontsize="16">Shipping note</text>
        <text>The body uses the normal page flow.</text>
    </body>
    <areas>
        <area width="32mm" height="10mm" right="4mm" top="4mm">
            <border background="#dcfce7" color="#166534" thickness="1pt" padding="2mm">
                <text fontsize="9">APPROVED</text>
            </border>
        </area>
    </areas>
</template>

Next Steps
After the first document structure is clear, read Areas for fixed-position layout, Template data to insert values, Layout fundamentals to adjust spacing and colors, and Controls to choose the right XML element for visible content.
| Previous: Introduction | Manual home | Next: Areas |